Natural Stone & Porcelain Installation Guide for Patios
Laying a patio with natural stone or external porcelain can create a beautiful, long-lasting outdoor space. However, a successful project depends on careful planning, material selection, and execution. Here’s a comprehensive guide on what to consider to ensure your natural stone or porcelain patio installation goes smoothly.
1. Choosing the Right Material
Selecting the appropriate material is the first step. Both natural stone and porcelain tiles offer distinct advantages, but they also have different characteristics.
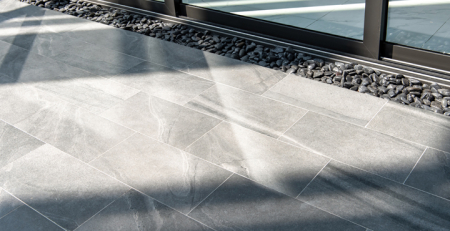
- Natural Stone: Known for its elegance and durability, natural stone (such as travertine, limestone, slate, or granite) creates a unique and luxurious aesthetic. Each piece of stone is unique, with its own colors and textures.
- Porcelain Tiles: Porcelain is highly durable, low-maintenance, and available in a wide variety of designs, including those that mimic natural stone. Porcelain is also non-porous, making it an excellent choice for patios exposed to rain or humidity.
Considerations:
- Climate: In regions with freeze-thaw cycles, porcelain’s resistance to water absorption and temperature changes makes it a better choice. Natural stone can also be suitable, but some types may require sealing to prevent moisture damage.
- Budget: Natural stone can be more expensive due to the cost of materials and labor, while porcelain offers a wide range of budget-friendly options.
2. Preparation and Planning
A well-prepared site is critical for the longevity and appearance of your patio. Here’s how to plan the area:
Site Layout
- Size and Shape: Plan the size based on your needs (e.g., dining area, lounge area). Use stakes and string to mark out the shape and dimensions of your patio.
- Sunlight and Drainage: Consider where the sun hits throughout the day. You may want to place the patio in a partially shaded area, or plan for umbrellas and pergolas.
- Slope for Drainage: Ensure the patio has a slight slope (around 1/4 inch per foot) to allow for proper water runoff. Poor drainage can cause water pooling, leading to stains and damage.
3. Base Preparation
Proper base preparation is crucial to avoid shifting, sinking, or cracking of your patio over time. Follow these steps for a solid foundation:
Excavation
- Digging the Area: Excavate the area to a depth of about 6-8 inches, depending on the material and intended use. This depth should include room for the base material and the paving material.
Sub-Base Installation
- Crushed Stone or Gravel: Lay a sub-base layer of compacted crushed stone or gravel (about 4-6 inches deep) to provide stability and drainage.
- Compacting: Compact the base material thoroughly to prevent settling. A plate compactor can be used for larger patios.
- Leveling: Ensure the surface is even, or slightly sloped for water drainage.
4. Laying the Natural Stone or Porcelain Tiles
Once the base is prepared, you can begin installing your natural stone or porcelain tiles. Here’s a step-by-step process:
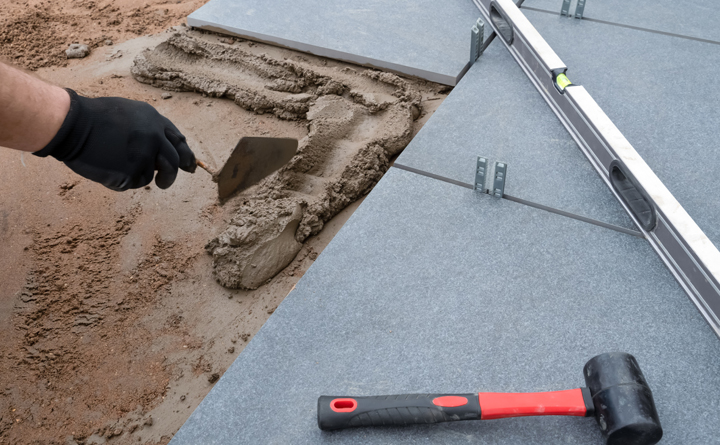
Step 1: Laying the Bedding Layer
- Sand or Mortar Bed: Depending on the material, you will either use a layer of sharp sand or a mortar bed to secure the tiles.
- For Natural Stone: A mortar bed is generally recommended for added strength.
- For Porcelain: Thin-set mortar is typically used.
Step 2: Laying the Tiles
- Tile Placement: Begin by laying the tiles or stones in your desired pattern, starting from one corner and working outwards. Use spacers to maintain even gaps for grout or jointing material.
- Cutting: You may need to cut tiles to fit around edges or corners. A wet saw or tile cutter will make accurate cuts while preventing chipping.
- Leveling: Tap the tiles gently with a rubber mallet to ensure they are level and properly adhered to the bedding layer.
5. Grouting or Jointing
After the tiles are laid, the spaces between them need to be filled. For natural stone and porcelain, this can be done with grout, mortar, or polymeric sand.
Step 1: Grouting or Jointing Material
- Polymeric Sand: Commonly used for pavers, polymeric sand hardens after wetting, preventing weeds and insect intrusion while stabilizing the pavers.
- Grout or Mortar: For natural stone or porcelain, grout (for smaller gaps) or mortar (for larger gaps) is used to fill joints.
Step 2: Cleaning Excess Grout or Sand
- Cleaning: Once the jointing material is applied, clean off any excess grout or sand from the tile surfaces with a sponge or soft brush before it dries.
6. Sealing (If Required)
Natural stone generally requires sealing to protect it from stains, moisture, and weathering. Porcelain is usually non-porous and may not need sealing, although some finishes (such as matte or textured tiles) can benefit from an extra protective layer.
- Sealant for Natural Stone: Apply a stone sealer after the grout or joint material has cured, typically 48 hours after installation.
- Optional Sealing for Porcelain: If you want additional protection for textured or unglazed porcelain, apply a sealant designed for porcelain surfaces.
7. Final Touches and Edging
To complete your patio, you’ll want to consider edge restraints and finishing details:
- Edge Restraints: Use paver edging or other border materials to keep the tiles or pavers in place. This prevents shifting and maintains the integrity of the installation.
- Landscaping: Enhance the space around your patio with plants, shrubs, or other decorative elements. You can use gravel or mulch around the edges to create a cohesive look.
8. Maintenance Tips
Keeping your patio in top shape requires regular maintenance, especially for natural stone installations.
- Cleaning: Sweep the patio regularly to remove debris. For deeper cleaning, use a mild detergent or a stone-specific cleaner for natural stone.
- Sealing: Natural stone patios may need to be resealed every 2-3 years, depending on exposure to weather and traffic.
- Weed Control: Check for weeds growing between the joints and remove them promptly. Applying polymeric sand can help prevent weed growth in paver installations.
Conclusion
Installing a patio with natural stone or porcelain requires careful planning, proper material selection, and attention to detail during each step of the installation process. From base preparation to final sealing, following these guidelines will ensure that your patio is not only beautiful but also durable enough to last for many years.